This month we will be looking at particles and particle effects that are in the air. Everyone knows it: light rays shining through leaves, sun rays through windows, the fog hanging in the valley, etc. All these effects can add depth to an image, convey a mood or just make it look epic. But how can you recreate such effects for your LEGO photos without artificially adding them through image editing? That’s what I’m going to explain to you this month.
First, let’s start with some theory. Basically, there are three types: fog, mist, and haze.
The Met Office UK defines it as follows:
Fog:
In our meteorological glossary, fog is defined as ‘obscurity in the surface layers of the atmosphere, which is caused by a suspension of water droplets’. By international agreement (particularly for aviation purposes) fog is the name given to resulting visibility less than 1 km. However, in forecasts for the public, this generally refers to visibility less than 180 m.
Mist:
Mist is defined as ‘when there is such obscurity and the associated visibility is equal to or exceeds 1000 m.’ Like fog, mist is still the result of the suspension of water droplets, but simply at a lower density. Mist typically is quicker to dissipate and can rapidly disappear with even slight winds, it’s also what you see when you can see your breath on a cold day.
Haze:
A third term you might also hear mentioned is haze. This is a slightly different phenomenon which is a suspension of extremely small, dry particles in the air, not water droplets. These particles are invisible to the naked eye but sufficient to give the air an opalescent appearance.
After all the theory, now a few small examples, before we continue with the tools and more detailed descriptions. In keeping with the season, I set up a small scene and recreated all three effects there. For comparison, the picture without mist or haze is shown in each case.


The first example image shows the effects of haze. The fog machine and LED continuous light were used for the picture. With an exposure time of 1.6s, a uniform haze is created.

Here is another example of haze. This time a flash was also used to create light coming in from outside. Due to the Haze in the building, the light is now not only soft, but also the light rays of the incident light become visible.


This is an example of mist. In this picture, an air humidifier was used instead of the fog machine. Where the soft beam of light was visible in the previous image, small particles can now be seen in the air. This is another way to make light rays visible. A flash from outside was used as illumination here as well.

This is an example of fog. In this case, of course, it has nothing to do with a realistic scenario, but you can clearly see the difference here. While Haze and Mist are rather discreet means, Fog is something dense, almost impenetrable.
In the following, I will first introduce you to the equipment and then explain, each with an example, how to get good fog, mist, or haze when photographing.
The Tools
In this post, I‘ll show you two tools and how you can use them to create fog, mist, and haze. The first one is a small face humidifier that I first saw on Four Bricks Tall’s posts. This is a very cheap helper, you can get it starting at 5€.
The operation is very simple, just like a large humidifier, water is filled into the device and this is atomized. In addition, it leaves no residue, except a little water, on the LEGO figures and bricks, camera, or other equipment. Due to the size and the relatively small amount of atomized water, it can be very well dosed and placed. It is therefore perfect for smaller scenes and targeted effects.
Another plus is that no lead time is required, the humidifier is ready to use immediately. Different effects can be achieved by using different exposure times. With a short exposure time, clear individual drops can be seen, this is what we call mist; with longer exposure times, it blurs into a kind of uniform haze.
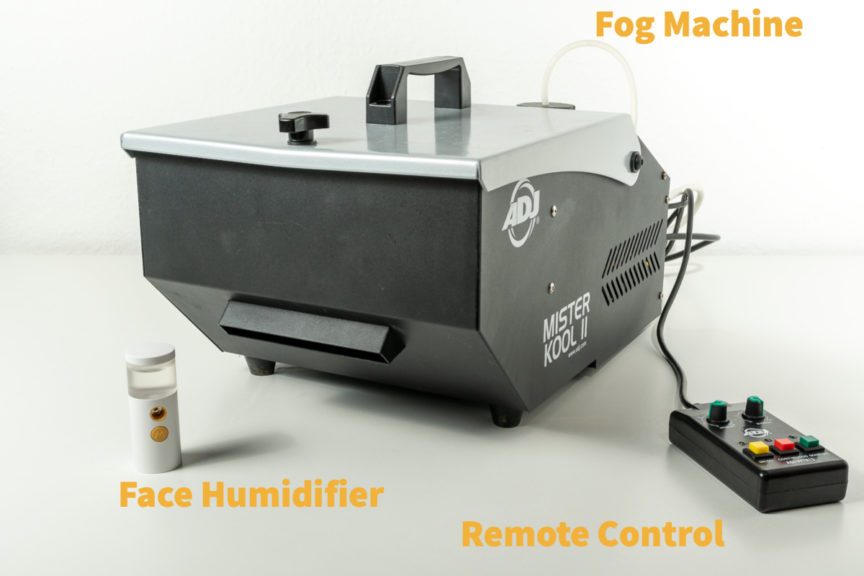
The second tool is a fog machine, these come in different sizes and start at about 30€. In a fog machine, a special liquid is vaporized and ejected. There are many different liquids with different properties, so there are liquids for denser or lighter fog with different lifetimes. Since the fog is generated by the evaporation of a liquid, this is often warmer than the ambient air and thus rises, to keep the fog closer to the ground, there are fog machines that have a compartment for ice cubes and thus cool the generated fog. When buying a fog machine, it is important to make sure that commercial liquid can be used and that it is possible to carefully dose the output.
In addition, there is also the possibility to create fog, especially ground fog with the help of dry ice and water. To do this, you simply spread a little dry ice and sprinkle it with water. The warmer the water, the stronger the effect. However, care should be taken not to use dry ice in closed rooms, as large amounts of CO2 are released.
There are also some so-called atmosphere aerosol sprays, from which I can only strongly advise against! These are oil-based and leave an oil film on the LEGO figures and sets, as well as on the camera, the lens, and in the entire environment.
Fog Machine vs. Face Humidifier
The two devices differ in some aspects and not every effect can be achieved with every device. Due to the atomization of water, the particles produced by a face humidifier are somewhat larger and can be clearly identified as individual particles. Whereas when vaporized in a fog machine, there are no individual visible particles in the air.
In addition, they differ significantly in the time life. While the water mist sinks to the ground within a few seconds, the fog remains stable over a long period of time. At the beginning it is a very dense fog, which spreads evenly in space over time and thus becomes a kind of haze.
Because of this property, a face humidifier is perfect for creating mist with it, whereas this is not possible with a fog machine. On the other hand, it is not possible to create a real fog with a face humidifier, because the particles do not stay in the air long enough to create a dense fog effect. However, both devices are suitable for creating haze.
Both devices emit something moving, so exposure time, as with anything moving, has a big impact on how it is captured in the resulting image. Therefore, I have created a small comparison in the following.
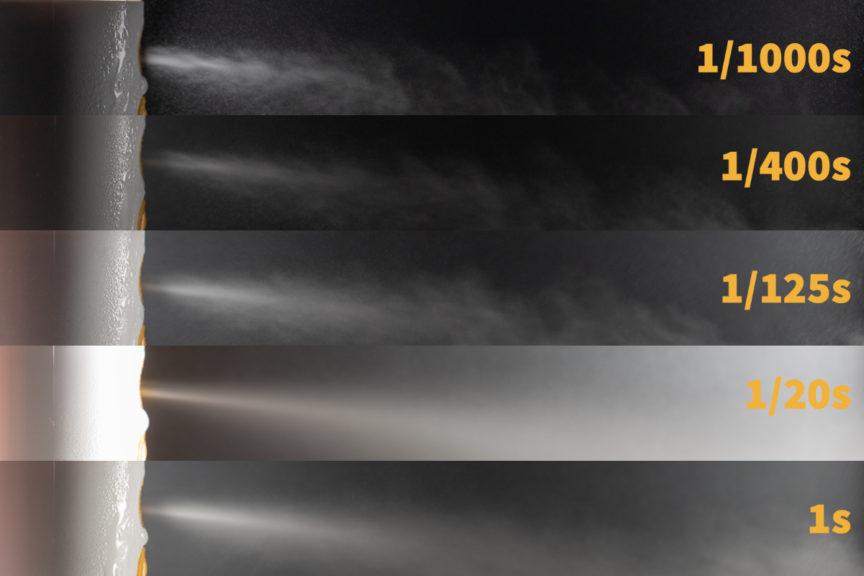
The image above shows the face mister at different exposure times. While you can see clear and sharp tropes at a very short exposure time of 1/1000s, they become more and more blurred at longer exposure times. At 1/400s up to 1/125s, individual particles can still be recognized, but these are no longer clear round points, but become elongated small strokes. If the image is exposed even longer, from 1/20s to over 1s, the individual drops become a uniform haze.
This observation is important because it shows that with continuous light you need an exposure time faster than 1/400s for the clear, small droplets in the air that you want to create for mist. It’s a little different when you use a flash instead of continuous light. Since the flash, regardless of the exposure time of the camera, only exposes very brightly for a very short moment (typically between 1/1000s and 1/4000s). This makes a flash in combination with a face humidifier perfect for creating mist, but unsuitable for obtaining haze.

Now we come to the fog machine, the picture above shows the output of a fog machine at the same exposure times as before with the face humidifier. You can clearly see that even with an exposure time of only 1/1000s a dense, uniform nebular is visible.
Of course, its appearance also changes with different exposure times. While at 1/1000s the swirls are clearly visible, they become more and more blurred until an even, all-covering fog is visible at an exposure time of 1s. A fog machine is therefore also suitable in conjunction with a flash to create haze or even dense fog in an image. Only the shape and uniformity change.
Creating Fog
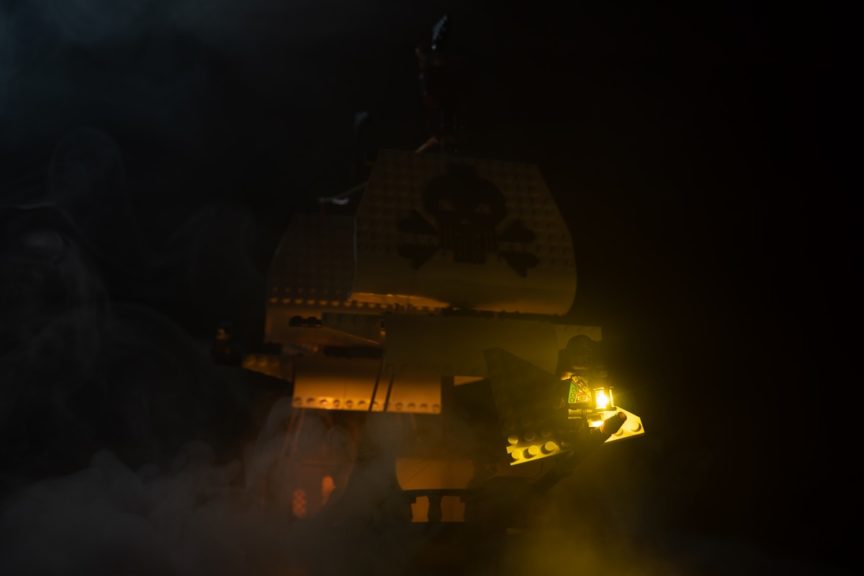
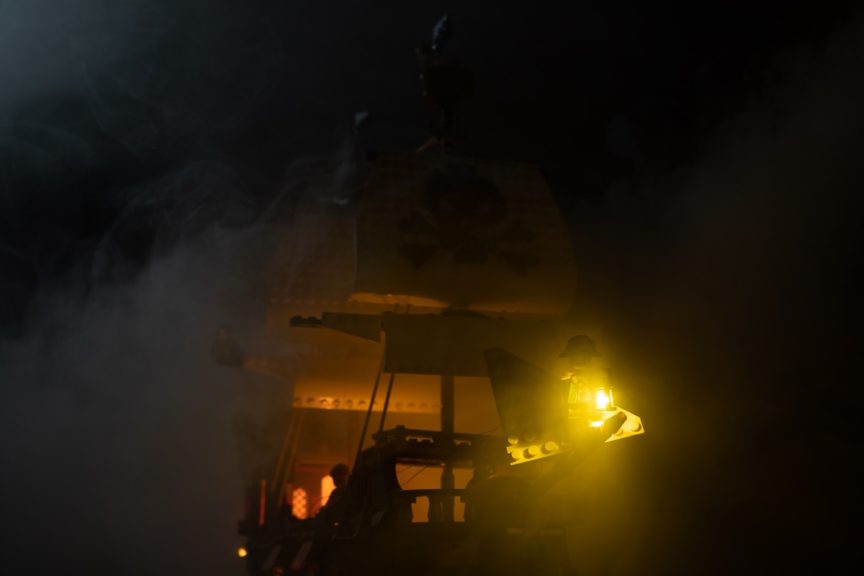
Let’s start creating fog. The following example is a pirate ship at night, slowly pushes its way through the fog, while the captain stands at the bow and tries to look through the fog with his lantern. A typical scene in which fog can be used to create a mystical and mysterious atmosphere.


To create this picture, i used the fog machine, the led lantern, a second led inside the ship and one flash from left above. The flash was used to simulate the moon and bring some environmental light into the scene. The captain holds a small lantern, which has been equipped with an led, in his hand. I also placed another led in the cabin to make the ship glow a little more. All of this can be seen in the image below.
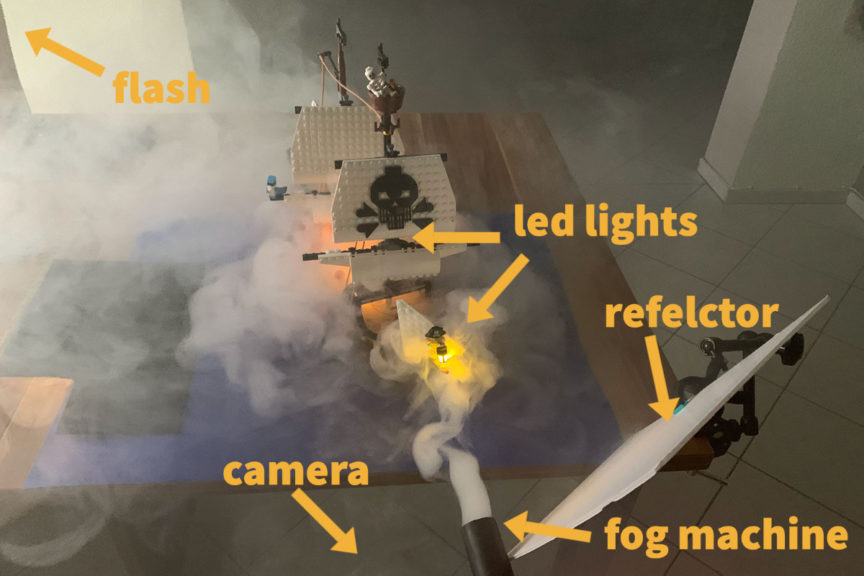
Since it is a relatively large object, I chose my 30mm lens. I set the exposure time to 1s, firstly because this gives the nebula a soft shape and secondly because the lantern in the captain’s hand is bright enough. I placed the flash in the upper left, outside the frame, to brighten the scene with some cool moonlight. I also used a white cardboard as a reflector to reflect the light of the flash to the front of the captain.
I also attached an old vacuum cleaner hose to my fog machine, that gives me a little more flexibility. Thus, I can place and control the fog more precisely without having to move the bulky fog machine.
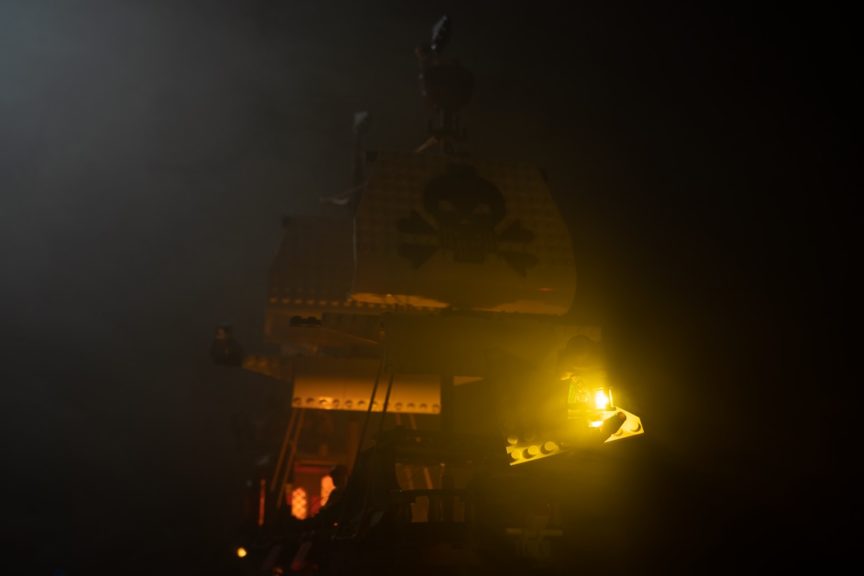
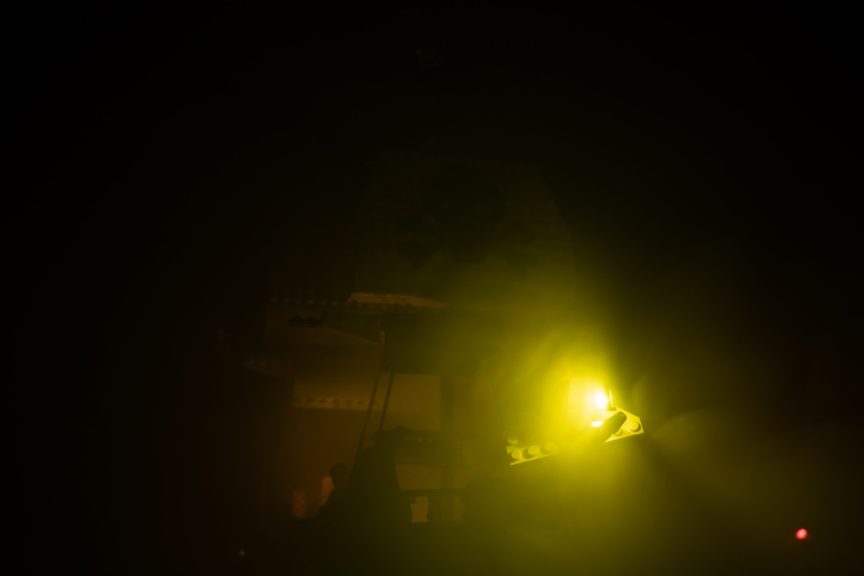
After the scene and the lighting is set, you just have to play a bit with the fog. Bring the fog into the scene from different directions, spread it out a bit, and take several photos. The fog will rarely be perfect in the first picture. Above you can see some photos that I sorted out.
Here are a few useful tips on how to use a fog machine:
- Close all windows and doors, because any breeze will blow away the fog or cause turbulence in the photo. This makes it much harder to achieve the desired effect.
- The smaller the room, the faster you will achieve an even distribution and get a uniform effect.
- Turn off the smoke detectors! Or close all doors to rooms with smoke detectors, the fog machine will definitely trigger them.
Creating Mist
We now come to mist. This is great effect to give your picture some depth and a more realistic look. As you can see in the image below, the small particles in the air change the overall mood in the picture.


The special thing in this picture is that I have combined two effects with each other. While in the upper part of the picture, in the bluish light, clear individual particles can be seen, around the lantern there is rather a soft glow. As in the pirate picture I used a shutter speed of 1s to get the light of the lantern bright enough, this is the reason for the soft glow around the lantern.
Because as described above, the output of a face humidifier transforms to a soft haze with long exposure times. But since we are now looking at mist, the question is how the small particles in the upper part of the image are created. As also described above, this requires a very short exposure time. I achieved this by my second light source, from above, being a flash and this exposed the droplets with approx. 1/2000s and freezes them thus. Let’s have a closer look at the setup.
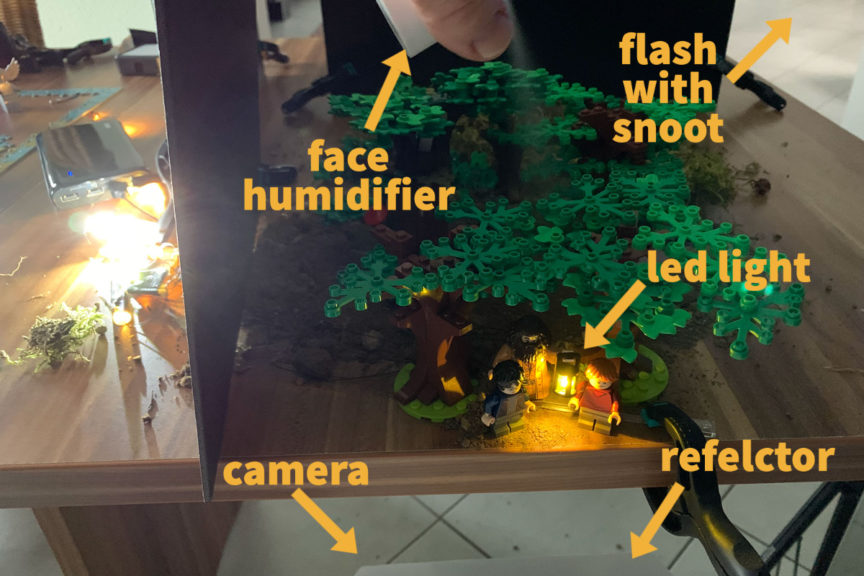
As you can see in the behind-the-scenes image above, I built a small forest scenery with some trees and placed the tree figures in front of them. Please note that the small drops are always much easier to see against a dark/black background than against a light background. That’s the reason why I put a piece of black cardboard here in the background.
The flash with a snoot is placed in the right top corner to light up the figures from slightly oblique above behind. To make the light look more like in a forest, I placed the front trees so that the light shines through their leaves. At least I held the face humidifier above the trees too and sprayed the water dust through the leaves.
In general, it is very easy to create mist. You just need a short exposure time (faster than 1/400s) and preferably a dark background. If you only have continuous lights, it’s probably necessary to use a slightly higher ISO to get the short exposure time you need.
Creating Haze
Haze is perfect for giving an image a softer look, making light look soft, or making rays of light visible. As described above, haze is something special, because it’s extremely small, dry particles in the air and not water droplets. To create this effect, there are special haze machines that spray a fine oil-based haze. This effect is very stable and no single drops or particles can be seen in the air. However, since such devices are very expensive and the oil leaves residues both on LEGO bricks and in the complete environment, we will try to imitate a haze effect in a different way.
This section explains how to creating a haze effect with a fog machine or face humidifier. If you look at the image below and compare the without and with haze look, the improvement is clearly visible. With haze, the image looks overall softer and the light ray from above is visible and creates a special and interesting look.


For this picture, I used the fog machine to generate the haze. I also used a flash with snoot to create the light beam. The scene itself is nothing special: I tried to simulate a cave or small valley with this old statue in the light.
As you can see below, I used plain wrapping paper for the background and shaped it into a kind of cave.
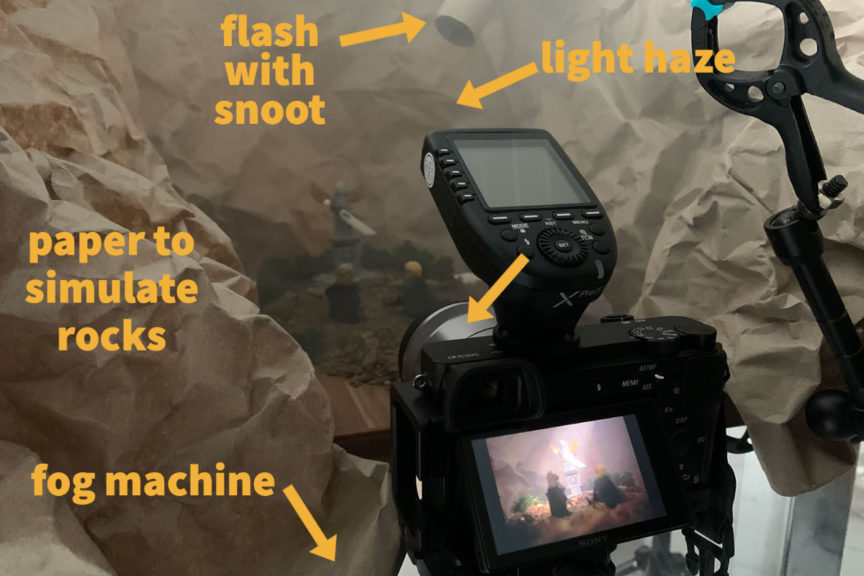
The flash with the snoot protrudes into the picture from diagonally above, slightly behind the statue and illuminates them from diagonally behind above. I created the haze with the help of the fog machine. To do this, I held the hose of the fog machine in the scene and then waited a few seconds up to minutes until the fog was distributed. In the picture you can see how a uniform haze covers the whole scene. To make the haze a bit more uniform and to prevent that you can see single drifts, I chose an exposure time of 1/15s.
Using the fog machine is my preferred way to create haze, but using the face humidifier works fine too. So let’s take a closer look at how to do this with the face humidifier.

The image above shows a comparison between the look of the haze with the fog machine of the left side and the face humidifier on the right. As you can see, the result is similar, but the right one is a little more subtle than the left one. This is due to the fact that the fog of the fog machine is longer in the air and thus a slightly higher, denser concentration is possible. Therefore, the effect here is somewhat stronger than with the water mist, which sinks relatively quickly to the ground. But the effect is still visible and the image is much more atmospheric than without haze.
In general, the setup of the scene is still the same. With one exception, instead of a flash, a led continuous light is used now. As described above, a long exposure time is necessary to achieve a haze effect with the face humidifier. Therefore, a continuous light and an exposure time of 2 seconds are needed here. Everything else remains unchanged.
To achieve the best possible distribution, it is necessary to move the face humidifier evenly through the entire scene during the exposure. This way you can achieve that the haze is not only concentrated at one point in the image, but is distributed over the entire image.
I hope I could give you a good insight how to create with fog, haze and mist and which tools you need for it. As with everything, it’s important to just try it out for yourself and practice a bit with the different techniques and tools.
Here’s a short video by Four Bricks Tall explaining how she creates atmosphere in her photos with mist and rain:
If you have any questions, suggestions or comments, just join the BrickCentral Discord server. There you will find many more helpful tips, discussions, and advice on the right equipment.