This month I will give you some tips on how to make large LEGO sets appear to be flying in your pictures.
And no, I am not talking about “using the Force” (though as a Star Wars fan, it was somehow tempting.)
You might remember some time ago that @y.badiner brilliantly showed us how to do this with minifigures.
For larger, heavier LEGO builds, having them suspended in mid-air for a photographic scene can be quite challenging but still possible with several practical approaches.
Call for “Technical” support
My first approach to lift things up is to use LEGO Technic parts to make a strong and stable stand. If official LEGO designers can do it, why not try it too? I’d even grab the dedicated stand if one comes with the set.
If none exists, or if you feel the provided one is not tall enough, I suggest studying the set’s structure to locate potential fixation points and start from there.
Thankfully, most of the large sets have internal structures built with Technic beams. There, unused accessible pin holes are perfect anchoring points.
For the LEGO City 60262 Passenger Airplane picture above I modified the LEGO Star Wars 75060 UCS Slave 1 stand and fixed it at the bottom of the plane; the angle was perfect to simulate take off. Yes I was lazy, but it worked nicely.


For the Star Wars snowspeeder in the Hoth assault scene below, I created my own inclined stand and attached it below the ship.


In the shots above smoke effects and lighting are real. I admit to having played a bit with Photoshop for the laser blasts.
When using visible supports, my ideal approach is to take 2 shots in identical shooting conditions: one with the set and one without it, the latter called the clean plate shot. Once combined, the two shots allow for very efficient and fast editing, where masking minimally affects the rest of the picture, as shown in the example below.


The clean plate technique obviously works best when the set doesn’t alter the lighting environment too much and does not cast shadows that would disappear when the set is removed. If that is the case, I then think about alternative approaches to support the set that doesn’t require making two shots (I’ll discuss it below).
Stands: Try a delicate balancing act
Physical stands are another way to hold large sets in the air. This is how the next two shots were made.


By “stand” I mean either a brick-built support, such as this Classic Space shot, or any stiff structure like the metallic clamp I used to lay the LEGO Marvel 76193 The Guardians’ Ship above the scene.
In this latter case the dedicated Technic stand coming with ship was simply too small. Instead I pinned some flat parts at the bottom of the set, and had these rest flat on the improvised metallic support.


For even larger sets, such as the LEGO Star Wars 75315 Imperial Light Cruiser in the scene below, I typically use a tripod combined with clamped LEGO bricks that I then fix below the sets.


This balancing act still remains risky when it solely depends on good equilibrium. If possible, try to use the clutching power of the bricks. I’d then recommend at least a 2×4 brick, or even longer. Some Technic bricks are even stronger for this too.
You can swipe the slides below to see the tripod holding the large imperial cruiser disappear with the use of a clean plate shot and some editing.


In all cases, it is critical to at least make educated guesses about the set’s equilibrium point. A small shift in the wrong direction can lead to catastrophic results.
Despite this, accidents do happen. I bumped into my “flying” Pirate ship from the shot below; it fell down 1.5m and crashed to bits on the floor.
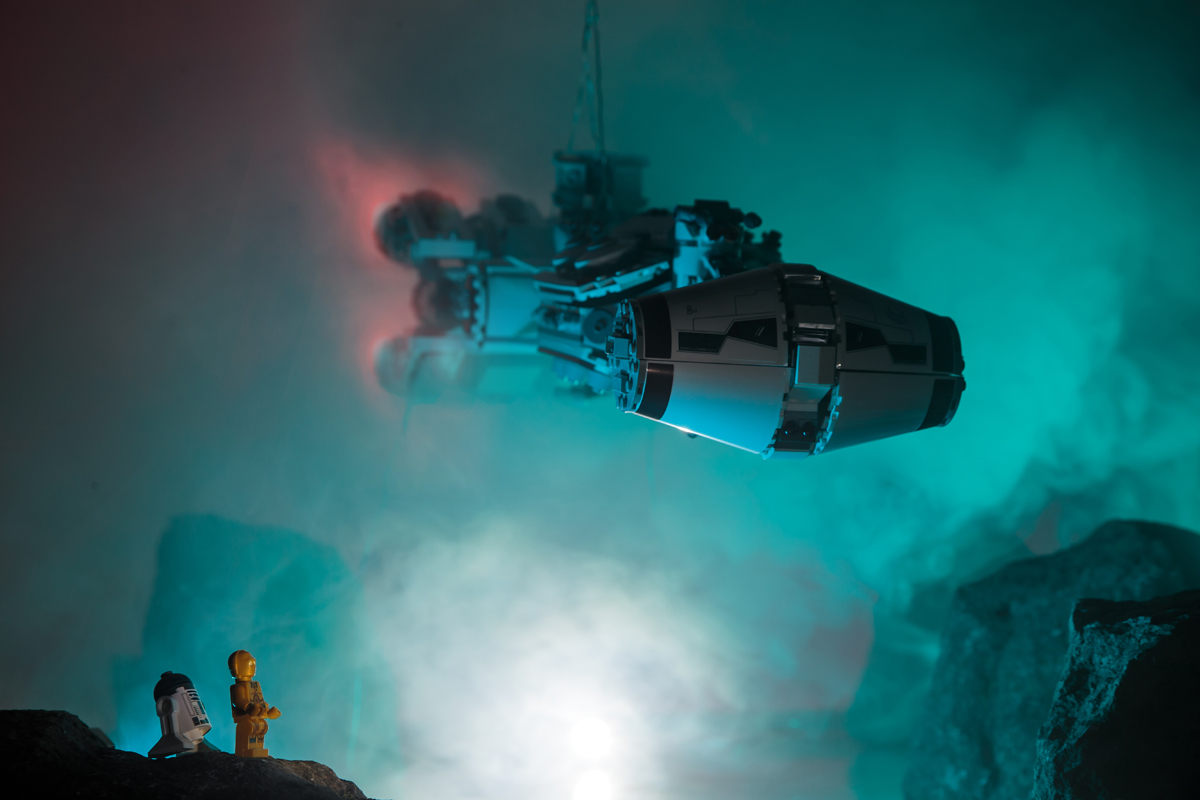
When using smoke for atmospheric effects and the environment varies too much between takes, using a clean plate shot becomes difficult. I find that using such approach then relies heavily on good editing techniques and patience. Combining smoke and strong lighting near the support can help hide part of it away.
In the scene I made with the floating LEGO Ideas 21322 Pirates of Barracuda Bay Ship, below, no editing was used to remove supporting elements.

Yes that ship floats in the air. It is loosely based on a digital painting I once saw.
Wires: Become a Puppet Master!
Using wires and cables is another way to lift sets in mid-air, probably the cleanest one too.


I typically use this approach when I know the clean plate technique wouldn’t easily be used to mask the support out, for instance when lighting changes due to the set’s presence in the scene. Thin wires are either near-invisible or easily cleaned up in post-editing.
For smaller sets such as the dragon flying towards the knight, shown above, simple sewing strings worked well.
For larger, heavier sets I’d recommend either fishing cable or even thin metallic strings, such as frame hanging wire. This is what I did for the shot of the LEGO Star Wars 75244 Tantive IV emerging from the clouds below.

It is crucial to find fixing points on the set: for large sets, I’d recommend Technic beams from the model’s internal structure. Passing a wire through unused Technic pin holes, as I did here below, is usually the best way to secure it in place. If none are apparent, you might need to take a few coverings off, but always make sure these are not visible in the shot.


Always remember that some large sets were not built to be lifted, but rather displayed flat on a table!
It is then crucial to study and understand your set’s structural stiffness. Make trials at low altitude before take off and look for signs of fragility.
I would clearly not recommend using wires to lift a >7000-parts set without precautions. The set shown above has a grasping handle (the radar dish) attached to the same Technic beams I used for passing the cables, so I knew it would not flinch or disintegrate in mid-air.
Such an approach often requires a strong frame mounted above the scene to tie cables to, as shown in the Behind-the-scenes shots for the dragon picture above. For those with limited space other solutions exist, such as clamps that can be mounted from the side of a table and arched above the scene (see the “assault on Hoth” Star Wars scene below).


Using several strings at different anchor points helps secure the set and avoids unwanted motion during shots, due to air flow and frame vibrations. This is what I did for the dragon with strings attached to the wings and the torso.
I find that using wires outdoors with potential wind and air gusts makes this technique even more tedious and I’d then suggest a stronger metal wire or alternatives ways to lift the sets, especially when no supporting frame is available.
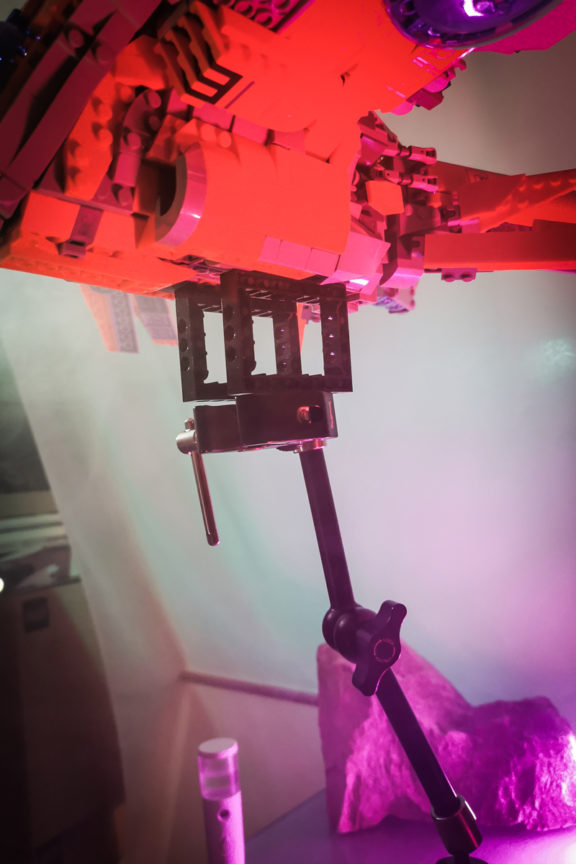
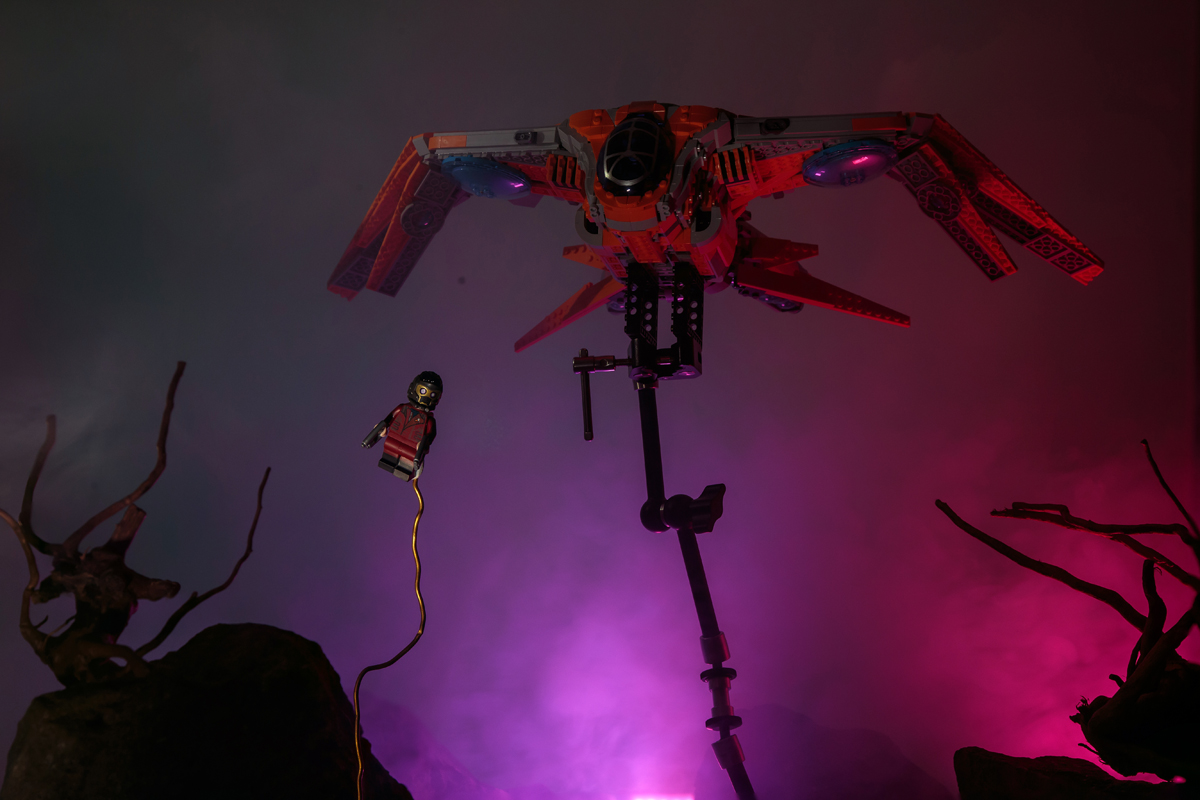
Clamps: Secure flight inside and outside
When maximum stability is what I am looking for and I have limited space to suspend a LEGO set, I use flexible arms with clamps.


Several types of clamps exist for use in photography, mainly to hold gear in place. Please feel free to reach out to me for references on the ones I used. The last picture above shows how small these clamps are (DISCLAIMER: no minifigure was injured by me in this demonstration.)
I found that these can be locked tight enough to hold moderate-sized sets in the air at angles not easily achievable with stands. This was the case when shooting the Star Wars “forest trench run” picture shown below. You can use the slider to see the clamps and arms magically disappear.


The versatility of such tools allows me to shoot flying sets both indoors, when I do not have easy access to outer frames for fixing wires, but also outdoors when I want to shoot a scene on the fly (pun intended).
As these are flexible, they can also be folded and packed within my camera bag.
More importantly, fixed on a tripod leg or a branch, they allow me to shoot a set outside without being affected by wind gusts.
Because the clamps are strong, they can potentially damage LEGO parts when squeezed too tight. If you are afraid to crush a set you care about, find some spare common parts that can serve as intermediate support.
I also try to position the clamps in ways that minimize their presence in the field of view, as seen below (slide again left to see the final shot). Again using a narrow depth-of-field, directed lighting and atmospheric effects can help you get rid of the clamps and arms without too much difficulty and reduced editing steps.


If nothing else works, editing can be done with a clean plate shot to more effectively mask the support off.
I hope I gave you some ideas on how to suspend LEGO sets for creative photography.
There are probably several other ways to give the illusion of flight that I did not cover, so feel free to drop a few words here, on our Instagram page or our Discord server to share your own experience and pictures made with any of these approaches!
DISCLAIMER: a few of the sets shown above were provided to me over the year by The LEGO Group and Brickcentral for toy photography: the LEGO City 60262 Passenger Airplane, as well as several LEGO Star Wars sets, the LEGO Star Wars 75315 Imperial Light Cruiser, the LEGO Star Wars 75301 Luke Skywalkers X-Wing Fighter, the LEGO Star Wars 75300 Imperial TIE Fighter, the LEGO Star Wars 75316 Mandalorian Starfighter and the LEGO Star Wars 75312 Boba Fett’s Starship. The rest, as well as gear used, come from my own collection.
This really helped me make a better stop motion. Thanks for all the help. God bless!