Dividing frame into thirds
The ‘rule of thirds’ is a widely accepted photography mantra. Landscape photographers place the horizon or a point of interest a ‘third’ or an intersection of horizontal and vertical thirds. It leads to a pleasing distribution of visual interest in a shot. You can easily achieve this with digital cameras as most have an optional grid visible on their LCD screens that splits your scene into 9 segments (interestingly while doing this tip I found that mine doesn’t!).
For minifig portraits, I already suggested using the rule of thirds earlier in the year – trying to get the eyes or at least the face of a character on the top right or left intersection of a picture’s thirds helps give space to a shot.
For a non-portrait minifig shot though, perhaps in landscape format, you should still think of the frame of your shot in thirds. Unless you are going for a very specific look, placing the subject directly in the centre of your frame is a limiting thing to do. It reduces the feeling of movement in the frame and allowance for what the character might do or might have done immediately before the photo. We’re all trying to make our minifigs look alive so we want to maximise their potential for action.


In the four shots above I’ve placed a character moving into the shot from the right, moving out of shot, squarely in the centre, and then a character in each third. Try to use these spaces to give intent and possibility to your pictures, the space in the frame allows our minds to interpret what might happen next or what just happened.
Splitting the frame into thirds generates balance if you place objects or points of interest in each one, and can help tell a story through anticipation, action and result or action, reaction and resolution. See how you can use the thirds of your frame in your next shots.
Eye-lines
Another way to give life to a scene is to add more characters and minifigs, but if they aren’t interacting realistically with each other then you still just have very small mannequins. Eye-lines are the vectors or directions that characters look in within your frame. If they are not looking directly into the camera then we need to believe these little plastic people are having some other internal thoughts.
A single character can have a ‘hero pose’ gazing off into the distance past the lens, looking to the future or towards a giant foe, but if you have two or more minifigs then you need to establish relationships between them or shared reactions to events.
It can be hard with the cylindrical faces of Lego people, but establishing eye contact can generate interest. Two characters can be having a conversation without looking at each other, but if there is nothing else in the frame or no believable expression on their faces it can look odd.

In this picture we have two characters sharing some gossip and their eye-lines probably intersect just in front of their actual faces. This is a compromise as LEGO people have no profiles to speak of but is also fairly true to life as people don’t always look directly at each other, especially when walking and talking.

In the second picture, I’ve tried to create a more dynamic scene with three different eye-lines. Nya is showing off to the camera, while Harumi is approaching from behind to play a prank, but to prevent that Akita is rushing in from the left to intercept her. This action and the eye-lines of the characters give movement and drama to the scene.
Try to get your minifigs looking at each other, interacting with expressions that fit with their motivations or the action, and you’ll have more interesting pictures with more life and feeling.
Bokeh
Bokeh is a weird word, is it singular or plural, is it a noun or an adjective?
It describes the lovely blurry nature of a scene where the foreground is in focus and the background not. It’s especially applied to photos that feature patterns of blurred light sources – reflections, city lights, glare off water etc. It can be a great effect for adding atmosphere and drama to a picture. So how do you go about generating and capturing it in a Lego photo?
To begin with, you need a light source and the best ones will generate lots of small points of light – so small strings of battery-powered lights, Xmas tree lights, lots of small candles, these will be good to start with.
Then you need to place these behind your subject, a good distance away (a few feet if you are shooting a macro scene like a minifig close-up, further away if you are shooting a large moc). Experiment with the distance to find the right effect for you, move the lights about and see where good reflections fall. Placing your subject on a reflective surface will help generate more bokeh shapes and glare.
The size and shape of the bokeh patterns depend on the distance between subject and background, the size of the lens aperture as you shoot, as well as the focal length of the shot.
In these shots, I have moved the subject further from the camera and closer to the lights with each one, and you can see how the effect changes.


In these shots, I kept the subject and lights in the same place but varied the aperture settings, and you can see the shapes get smaller.


Experimentation is key, arrange the lights differently between shots, add coloured gels or cellophane in front of the lights,
Shapes in bokeh
Bokeh shapes are determined by the internal dimensions and shapes of your camera’s lens. So mostly the patterns will be hexagonal or octagonal or close to round. This represents the internal lens diaphragm as it opens and closes as you increase or decrease the aperture.
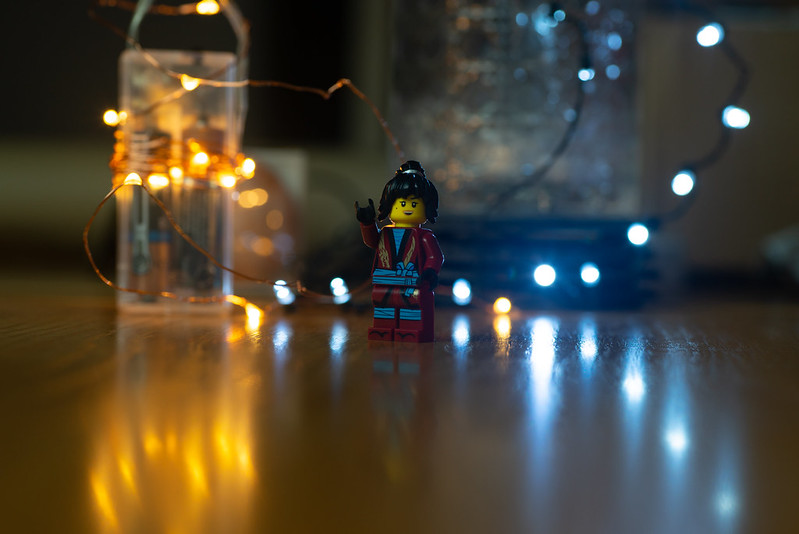
This picture is with a fairly wide aperture, the subject very close to the camera and the lights a good couple of feet behind the subject.

However, with some experimentation, you can have bokeh in more or less any shape you please. If you cut out small shapes in thin card and then place the card with the hole carefully in front of the lens you will see the patterns of bokeh now look like whatever you have cut out – stars or squares or birds or planes.

Placing the cut-outs in front of the lens limits the amount of light entering the camera especially from the periphery, so you will need to adjust you shutter speed or ISO accordingly, and play about to get the right size and position of the cut-out for your lens, but when you get it right it is a fun way to add in-camera effects to your shots.

You’ll need a sharp knife and some patience but it’s worth it for a great shot!
Great tip!! .. That next level Bokeh is really interesting!!